Selecting from an Expandable Tree View
There are five types of tree view selection options.
Navigate to an individual option to edit by clicking on a
specific tree view node, or by pressing the  or
or  keys.
keys.
Tree view branches allow for a group of options to be
listed together in a separate group (e.g. a group of radio buttons). A collapsed
branch is represented by the  icon,
while an expanded branch is represented by the
icon,
while an expanded branch is represented by the  icon. Double-click a branch to expand or
collapse that branch, or navigate to a branch and press the
icon. Double-click a branch to expand or
collapse that branch, or navigate to a branch and press the  key to expand the branch or the
  key to collapse the branch.
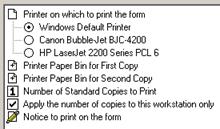
Similar to standard radio buttons (see Selecting Options), round tree view option buttons are used to select options where one option must be selected out of many choices. Click a radio button, or navigate to the option and press the Space key, to select an option.
Similar to checkboxes (see Selecting Options), square tree view option buttons are used when multiple options may be selected independently. Click a checkbox, or navigate to the checkbox and press the Space key, to toggle the selection for an option.
A tree view option with a numeric digit  represents a numeric value (e.g. number of
copies to print). Click a number, or navigate to the option press the Space
key, to increment through the valid number options. When the maximum
allowable value is reached then clicking the number again resets the number to
the minimum allowable value (usually 0 or 1).
represents a numeric value (e.g. number of
copies to print). Click a number, or navigate to the option press the Space
key, to increment through the valid number options. When the maximum
allowable value is reached then clicking the number again resets the number to
the minimum allowable value (usually 0 or 1).
A tree view option with a pencil icon  indicates that there is a data field on the
right side that may be entered or edited. Click on the data field, or navigate
to the option and press the key, to
move from the tree view to the data field. Enter or edit data as you normally
would in a field of the same type (see Entering and Selecting Data). After
entering or editing data, click back on the tree view, or press the Home
key to move the cursor to the front of the data field, and then the key to return to the tree view.
indicates that there is a data field on the
right side that may be entered or edited. Click on the data field, or navigate
to the option and press the key, to
move from the tree view to the data field. Enter or edit data as you normally
would in a field of the same type (see Entering and Selecting Data). After
entering or editing data, click back on the tree view, or press the Home
key to move the cursor to the front of the data field, and then the key to return to the tree view.
 Attachments