Appendix A: Buttons and Icons
Toolbar Buttons
 Log in or log out (see Logging In and Out)
 Create a new empty database
(see Creating a New Empty Access
Database, Creating a New Empty
MySQL Database, and Creating a New Empty
Microsoft SQL Server Database)
Create a new empty database
(see Creating a New Empty Access
Database, Creating a New Empty
MySQL Database, and Creating a New Empty
Microsoft SQL Server Database)
 Open an existing database (see
Opening an Existing Access
Database, Opening an Existing
MySQL Database, and Opening an Existing
Microsoft SQL Server Database)
Open an existing database (see
Opening an Existing Access
Database, Opening an Existing
MySQL Database, and Opening an Existing
Microsoft SQL Server Database)
 Synchronize mobile edition
database (see Synchronizing a
Mobile Edition Database)
Synchronize mobile edition
database (see Synchronizing a
Mobile Edition Database)
 Open the user security module
(see Browsing Users)
Open the user security module
(see Browsing Users)
Add a new record (see Adding Records)
 Edit an existing record (see Editing Records)
 View an existing record (see Viewing Records)
 Delete a record (see Deleting Records)
 Save the record being edited
(see ?)
Save the record being edited
(see ?)
 Switch to the browse window
for the record being edited (see ?)
Switch to the browse window
for the record being edited (see ?)
 Undo changes to the active
entry field (see Undo)
Undo changes to the active
entry field (see Undo)
 Cut selected data from the
active entry field to the Windows clipboard (see Cut)
Cut selected data from the
active entry field to the Windows clipboard (see Cut)
 Copy selected data from the
active entry field to the Windows clipboard (see Copy)
Copy selected data from the
active entry field to the Windows clipboard (see Copy)
 Paste data from the Windows
clipboard to the active entry field (see Paste)
Paste data from the Windows
clipboard to the active entry field (see Paste)
 Check spelling in the active
entry field (see Spell Check)
Check spelling in the active
entry field (see Spell Check)
 Sort records in ascending or
descending order (see Sorting Data)
Sort records in ascending or
descending order (see Sorting Data)
 Set a group filter (see Group Filters)
 Reset all field filters (see Filtering or Searching
Data by Column (Field Filters), and Saving
Field Filters)
Reset all field filters (see Filtering or Searching
Data by Column (Field Filters), and Saving
Field Filters)
 Refresh data (see Refreshing Data)
 Open the makes and models
setup module (see Makes and Models
Overview)
Open the makes and models
setup module (see Makes and Models
Overview)
 Open the serial number notices
setup module (see Serial Number
Notices Overview)
Open the serial number notices
setup module (see Serial Number
Notices Overview)
 Open the customers main module
(see Customers Overview)
Open the customers main module
(see Customers Overview)
 Open the vendors main module
(see Vendors Overview)
Open the vendors main module
(see Vendors Overview)
 Open the repair
orders/invoices main module (see Repair
Orders Overview)
Open the repair
orders/invoices main module (see Repair
Orders Overview)
 Open the sales invoices main
module (see Sales Invoices Overview)
Open the sales invoices main
module (see Sales Invoices Overview)
 Open the credit notes main
module (see Credit Notes Overview)
Open the credit notes main
module (see Credit Notes Overview)
 Open the purchase orders main
module (see Purchase Orders
Overview)
Open the purchase orders main
module (see Purchase Orders
Overview)
 Open the inventory main module
(see Inventory Overview)
Open the inventory main module
(see Inventory Overview)
 Open the service codes main
module (see Service Codes Overview)
Open the service codes main
module (see Service Codes Overview)
 Open the package codes main
module (see Package Codes Overview)
Open the package codes main
module (see Package Codes Overview)
 Open the warranty cards main
module (see Warranty Cards Overview)
Open the warranty cards main
module (see Warranty Cards Overview)
 Open the reports module (see
Reports Window)
Open the reports module (see
Reports Window)
 Open the stopwatch (see Stopwatch)
 Record keystroke macros (see
Recording Keystroke Macros)
Record keystroke macros (see
Recording Keystroke Macros)
 Select and run a keystroke
macro (see Running Keystroke
Macros)
Select and run a keystroke
macro (see Running Keystroke
Macros)
 Open the standard notes module
(see Standard Notes Overview)
Open the standard notes module
(see Standard Notes Overview)
 Open the electronic help file
(see Electronic Help File)
Open the electronic help file
(see Electronic Help File)
 Open program tips (see Program Tips)
 Open the At Your Service
Software, Inc. web site (see Video Tutorials XE "help:video
tutorials "
Open the At Your Service
Software, Inc. web site (see Video Tutorials XE "help:video
tutorials "
)
(See also Toolbar, and Toolbar Options.)
Status Bar Icons
Automatic backup in progress
(see Backup
Verification)
 Automatic backups are disabled
on the current workstation (see Automatically Backing Up an
Access Database)
Automatic backups are disabled
on the current workstation (see Automatically Backing Up an
Access Database)
(See also Status Bar.)
Standard Icons on Edit Windows and Dialog Windows
Edit the associated record
(see ?)
View the associated record
(see ?)
 Write a letter using Microsoft
Word (see Writing a Letter Using
Microsoft Word)
Write a letter using Microsoft
Word (see Writing a Letter Using
Microsoft Word)
 Print an envelope using
Microsoft Word (see Printing
Envelopes Using Microsoft Word)
Print an envelope using
Microsoft Word (see Printing
Envelopes Using Microsoft Word)
 Stard the label wizard in
Microsoft Word (see Printing
Labels Using Microsoft Word)
Stard the label wizard in
Microsoft Word (see Printing
Labels Using Microsoft Word)
 View a map of the address (see
Viewing a Map)
View a map of the address (see
Viewing a Map)
 View driving directions to or
from the address (see Viewing
Driving Directions)
View driving directions to or
from the address (see Viewing
Driving Directions)
 Send an SMS text
message (see Sending an SMS Text
Message)
Send an SMS text
message (see Sending an SMS Text
Message)
 Send a fax (see Sending a Fax)
 Send an e-mail (see Sending an E-mail)
 Browse a web site (see Browsing a Web Site)
 Track a shipment on-line (see
Tracking Shipments
On-Line)
Track a shipment on-line (see
Tracking Shipments
On-Line)
Insert a standard note (see Inserting Standard Notes)
 Attach a file (see Attaching a File)
 Attach a digital photograph
(see Attaching a Digital
Photograph)
Attach a digital photograph
(see Attaching a Digital
Photograph)
 Attach an electronic signature
(see Attaching an Electronic
Signature)
Attach an electronic signature
(see Attaching an Electronic
Signature)
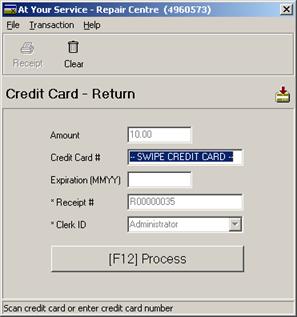
To start an X-Charge credit card return transaction, begin
by opening either the individual payment window or the batch payments window
(see “Paying Individual Invoices” on page 419, and “Paying Batches of Invoices”
on page 421). Enter a payment amount less than 0.00 in the Amount to
Pay field, select any credit card or the Other payment type from the
Payment Method field (it does not matter which one), and optionally enter
reference information in the Reference field. Click the Credit
Card button to open the X-Charge transaction window. If you have the physical credit card in your posession then
swipe it through your credit card reader and either click the Process
button or press the F12 key to begin processing. If you do not have the physical credit card in your
possession then enter the credit card number and expiry date, and either click
the Process button or press the F12 key to begin processing. If the transaction is approved then a negative payment
record will be automatically added to the At Your Service database with the
actual credit card type swiped, the current date, and a six-digit confirmation
number appended to the end of any previously entered payment reference. If the transaction is declined then the reason will be
displayed so that appropriate action can be taken. Processing
Debit Card Purchase Transactions Process a credit card
or debit card purchase transaction (see Processing Credit Card
Purchase Transactions, and
Process a credit card
or debit card purchase transaction (see Processing Credit Card
Purchase Transactions, and

)
 Process a credit card or debit
card return transaction (see Processing Credit Card Return
Transactions, and Processing Debit Card Return
Transactions)
Process a credit card or debit
card return transaction (see Processing Credit Card Return
Transactions, and Processing Debit Card Return
Transactions)
 Browse for a file or folder
(see ?)
Browse for a file or folder
(see ?)
 Test communication settings
(see ?)
Test communication settings
(see ?)
 Appendix B: Keyboard
Shortcuts
Appendix B: Keyboard
Shortcuts