Communication Tools
Entry modules that have contact address and information fields also include various communication tools that facilitate efficient use of that contact information.
Copying a Formatted Address to the Windows Clipboard
Click the  button to copy the formatted contact
address from the entry window to the Windows clipboard so that it may be pasted into another
application (see also Using the Windows
Clipboard). On entry windows that have menus, you may also select
Communication
button to copy the formatted contact
address from the entry window to the Windows clipboard so that it may be pasted into another
application (see also Using the Windows
Clipboard). On entry windows that have menus, you may also select
Communication  Copy
Address to Clipboard from the main menu or press the Ctrl+K key
combination. This button will only be enabled if contact or address information
has been entered.
Copy
Address to Clipboard from the main menu or press the Ctrl+K key
combination. This button will only be enabled if contact or address information
has been entered.
The country will only be included in the formatted address if it is different from the country entered on the business location address of the currently logged in user (see Business Location - Address Tab).
Writing a Letter Using Microsoft Word
Click the  button to open a letter template in
Microsoft Word in order to write a letter to the contact address entered on the
entry window. On entry windows that have menus, you may also select
Communication Write a
Letter using Microsoft Word from the main menu. This button will only be
enabled if contact or address information has been entered and Microsoft Word is
detected on your computer.
button to open a letter template in
Microsoft Word in order to write a letter to the contact address entered on the
entry window. On entry windows that have menus, you may also select
Communication Write a
Letter using Microsoft Word from the main menu. This button will only be
enabled if contact or address information has been entered and Microsoft Word is
detected on your computer.
The default template is for standard Letter size paper (8½ inches or 21.6 cm wide, 11 inches or 27.9 cm tall). In the header of the letter will be the company name and business location return address of the currently logged in user (see Business Locations). In the body of the letter will be today’s date followed by the formatted destination contact address from the entry window.
The template may be edited if you normally use another size of paper (e.g. legal, A4, etc.). The Microsoft Word letter template is named aysLetter.dot and can be found and edited in the Custom subfolder where At Your Service was installed (by default C:\Program Files\At Your Service\Custom\aysLetter.dot on 32-bit systems or C:\Program Files (x86)\At Your Service\Custom\aysLetter.dot on 64-bit systems). If you choose to edit the template in order to include your business logo and preferred contact information formatting then delete the bookmark named AYS from the template. When that bookmark is not found then the company name and business location return address will not automatically be inserted into the header of the letter since it is assumed that contact information has already been included in the template. Instead, the cursor will simply be positioned after the last character in the document and the formatted destination contact address from the entry window will be inserted at that location.
See the Microsoft Word help documentation for further instructions on working with Microsoft Word and templates.
Printing Envelopes Using Microsoft Word
Click the  button to open an envelope template in
Microsoft Word in order to create envelopes addressed to the contact address
entered on the entry window. On entry windows that have menus, you may also
select Communication Print Envelopes using Microsoft Word
from the main menu. This button will only be enabled if contact or address
information has been entered and Microsoft Word is detected on your
computer.
button to open an envelope template in
Microsoft Word in order to create envelopes addressed to the contact address
entered on the entry window. On entry windows that have menus, you may also
select Communication Print Envelopes using Microsoft Word
from the main menu. This button will only be enabled if contact or address
information has been entered and Microsoft Word is detected on your
computer.
The default template is for standard Number 10 size envelopes (4⅛ inches or 10.5 cm tall, 9½ inches or 24.1 cm wide). In the upper-left corner of the envelope will be the company name and business location return address of the currently logged in user (see Business Locations). In the center of the envelope will be today’s date followed by the formatted destination contact address from the entry window.
The template may be edited if you normally use another size of envelope (e.g. monarch, DL, etc.). The Microsoft Word envelope template is named aysEnvelope.dot and can be found and edited in the Custom subfolder where At Your Service was installed (by default C:\Program Files\At Your Service\Custom\aysEnvelope.dot on 32-bit systems or C:\Program Files (x86)\At Your Service\Custom\aysEnvelope.dot on 64-bit systems). If you choose to edit the template in order to include your business logo and preferred contact information formatting then delete the bookmark named AYS from the template. When that bookmark is not found then the company name and business location return address will not automatically be inserted in the upper-right corner of the envelope since it is assumed that contact information has already been included in the template. Instead, the cursor will simply be positioned after the last character in the document and the formatted destination contact address from the entry window will be inserted at that location.
See the Microsoft Word help documentation for further instructions on working with Microsoft Word and templates.
Printing Labels Using Microsoft Word
Click the  button to open the standard label wizard in
Microsoft Word and automatically paste in the formatted mailing address of the
contact so that you can create and print address labels. On entry windows that
have menus, you may also select Communication Print Labels using Microsoft Word from
the main menu. This button will only be enabled if contact or address
information has been entered and Microsoft Word is detected on your
computer.
button to open the standard label wizard in
Microsoft Word and automatically paste in the formatted mailing address of the
contact so that you can create and print address labels. On entry windows that
have menus, you may also select Communication Print Labels using Microsoft Word from
the main menu. This button will only be enabled if contact or address
information has been entered and Microsoft Word is detected on your
computer.
Within the label wizard, you may select from a variety of commercial label formats and templates. See the Microsoft Word help documentation for further instructions on working with Microsoft Word and the label wizard.
Viewing a Map
Click the  button to open the default web browser
program and view a street map of the contact address entered on the entry
window. On entry windows that have menus, you may also select Communication
View a Map from the
main menu. This button will only be enabled if contact or address information
has been entered and a web browser program is detected on your computer.
button to open the default web browser
program and view a street map of the contact address entered on the entry
window. On entry windows that have menus, you may also select Communication
View a Map from the
main menu. This button will only be enabled if contact or address information
has been entered and a web browser program is detected on your computer.
At Your Service presently supports the on-line mapping services listed in the following table. The mapping services are available only for licensed users of the software version number listed in the last column, or any higher version number. Contact At Your Service Software, Inc. if you wish to have support added for an additional on-line mapping service.
On-Line Mapping Services
|
Service |
Web Site |
Version |
|
MapQuest |
1.0 | |
|
Google Maps |
2.7 |
It is assumed that the entered contact address information is in a standard format that is readily understood by the on-line mapping services.
Viewing Driving Directions
Click the  button to open the default web browser
program and view driving directions from the business location address of the
currently logged in user (see Business
Locations) to the contact address entered on the entry window. Holding down
the Shift key while clicking on the button displays the reverse driving
directions, from the contact address entered on the entry window to the business
location address of the currently logged in user. On entry windows that have
menus, you may also select Communication View Driving Directions To or
Communication View
Driving Directions From from the main menu. This button will only be enabled
if contact or address information has been entered and a web browser program is
detected on your computer.
button to open the default web browser
program and view driving directions from the business location address of the
currently logged in user (see Business
Locations) to the contact address entered on the entry window. Holding down
the Shift key while clicking on the button displays the reverse driving
directions, from the contact address entered on the entry window to the business
location address of the currently logged in user. On entry windows that have
menus, you may also select Communication View Driving Directions To or
Communication View
Driving Directions From from the main menu. This button will only be enabled
if contact or address information has been entered and a web browser program is
detected on your computer.
At Your Service presently supports the on-line mapping services listed in the following table. The mapping services are available only for licensed users of the software version number listed in the last column, or any higher version number. Contact At Your Service Software, Inc. if you wish to have support added for an additional on-line mapping service.
On-Line Mapping Services
|
Service |
Web Site |
Version |
|
MapQuest |
1.0 | |
|
Google Maps |
2.7 |
It is assumed that the entered contact address information is in a standard format that is readily understood by the on-line mapping services.
Driving directions from the contact address entered on the entry window to the business location address of the currently logged in user is available only for licensed users of version 2.7 and higher.
Sending an SMS Text Message
Click the  button to write and send an SMS text message to the mobile phone number of the
contact entered on the entry window, or to one or more manually entered mobile
phone numbers. On entry windows that have menus, you may also select
Communication Send an
SMS Text Message from the main menu. This button will only be available if a
mobile phone number has been entered and SMS text messaging has been configured
(see Communication
Options - SMS Text Messaging Tab).
button to write and send an SMS text message to the mobile phone number of the
contact entered on the entry window, or to one or more manually entered mobile
phone numbers. On entry windows that have menus, you may also select
Communication Send an
SMS Text Message from the main menu. This button will only be available if a
mobile phone number has been entered and SMS text messaging has been configured
(see Communication
Options - SMS Text Messaging Tab).
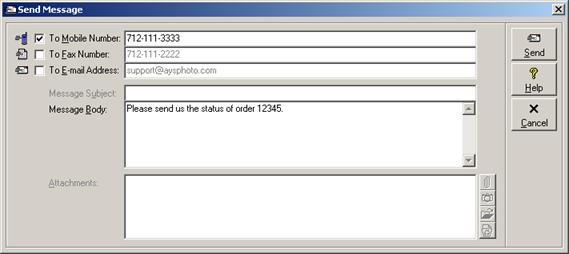
Optionally check the boxes to also send the message via fax and/or e-mail at the same time (see Sending a Fax, and Sending an E-mail). Enter the destination address and the message itself and then click the Send button to send the message. Click the Cancel button or press the Esc key to quit without sending a message. Each of the message fields are discussed in the following table.
SMS Text Message Entry Fields
|
Field |
Description |
|
To Mobile Number |
Enter one or more mobile phone numbers to which the SMS text message is to be sent. Multiple mobile phone numbers must each be separated by a semicolon (;). The default will be the mobile phone number entered on the record from which the send message window was activated. |
|
Message Body |
Enter the text message. Some SMS text messaging services limit the message to the first 71 characters. |
Sending SMS text messages is available only for licensed users of version 2.5 and higher, and is not available in the Repair Lite and Repair Micro editions.
Sending a Fax
Click the  button to write and send a fax message to
the fax number of the contact entered on the entry window, or to one or more
manually entered fax numbers. On entry windows that have menus, you may also
select Communication Send a Fax from the main menu. This
button will only be available if a fax number has been entered and faxing has
been configured (see Communication
Options - Fax Tab).
button to write and send a fax message to
the fax number of the contact entered on the entry window, or to one or more
manually entered fax numbers. On entry windows that have menus, you may also
select Communication Send a Fax from the main menu. This
button will only be available if a fax number has been entered and faxing has
been configured (see Communication
Options - Fax Tab).
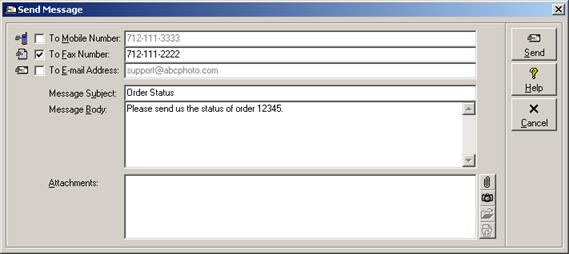
Optionally check the boxes to also send the message via SMS text messaging and/or e-mail at the same time (see Sending an SMS Text Message, and Sending an E-mail). Enter the destination address, the message itself, and optional attachments and then click the Send button to send the message. Click the Cancel button or press the Esc key to quit without sending a message. Each of the message fields are discussed in the following table.
Fax Entry Fields
|
Field |
Description |
|
To Fax Number |
Enter one or more fax numbers to which the fax is to be sent. Multiple fax numbers must each be separated by a semicolon (;). The default will be the fax number entered on the record from which the send message window was activated. |
|
Message Subject |
Enter a subject heading to be printed just above the message on the fax. |
|
Message Body |
Enter the message to be printed on the fax. |
|
Attachments |
Select any files or digital photographs to be printed on successive pages of the fax (e.g. Microsoft Word documents, Microsoft Excel spreadsheets; see Attachments). The fax server or fax service must support printing of the attached document types. |
(See also Faxing a Form, and Faxing a Report.)
Sending an E-mail
Click the  button to write and send an e-mail message
to the contact entered on the entry window, or to one or more manually entered
e-mail addresses. On entry windows that have menus, you may also select
Communication Send an
E-mail from the main menu. This button will only be available if an e-mail
address has been entered and e-mail has been configured (see Communication Options - E-mail
Tab).
button to write and send an e-mail message
to the contact entered on the entry window, or to one or more manually entered
e-mail addresses. On entry windows that have menus, you may also select
Communication Send an
E-mail from the main menu. This button will only be available if an e-mail
address has been entered and e-mail has been configured (see Communication Options - E-mail
Tab).
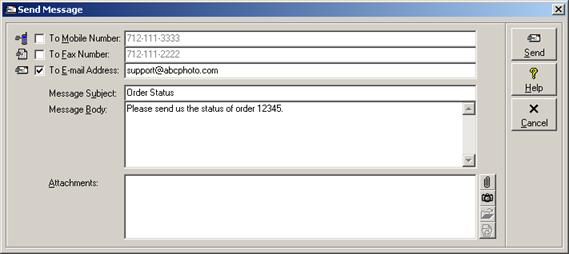
Optionally check the boxes to also send the message via SMS text messaging and/or fax at the same time (see Sending an SMS Text Message, and Sending a Fax). Enter the destination address, the message itself, and optional attachments and then click the Send button to send the message. Click the Cancel button or press the Esc key to quit without sending a message. Each of the message fields are discussed in the following table.
E-mail Entry Fields
|
Field |
Description |
|
To E-mail Address |
Enter one or more e-mail addresses to which the e-mail is to be sent. Multiple e-mail addresses must each be separated by a semicolon (;). The default will be the e-mail address entered on the record from which the send message window was activated. |
|
Message Subject |
Enter a subject heading for the e-mail. |
|
Message Body |
Enter the message body for the e-mail. |
|
Attachments |
Select any files or digital photographs to be attached to the e-mail (see Attachments). |
(See also E-mailing a Form, and E-mailing a Report.)
Browsing a Web Site
Click the  button to open the default web browser
program and view the web site for the contact entered on the entry window. On
entry windows that have menus, you may also select Communication Browse Web Site from the main
menu. This button will only be enabled if a web site address has been entered
and a web browser program is detected on your computer.
button to open the default web browser
program and view the web site for the contact entered on the entry window. On
entry windows that have menus, you may also select Communication Browse Web Site from the main
menu. This button will only be enabled if a web site address has been entered
and a web browser program is detected on your computer.
Tracking Shipments On-Line
When shipping or receiving packages, the courier company
(i.e. ship via) and courier tracking code may both be recorded so that the
shipment can be tracked. Click the  button to open the default web browser
program and track the location of the entered shipment using the tracking web
site of the specified courier company. On entry windows that have menus, you may
also select Communication Track Shipment On-line from the main
menu. This button will only be enabled if the selected courier supports on-line
shipment tracking (see Shipping Methods), a
tracking code has been entered, and a web browser program is detected on your
computer. Only the first part of the Ship Via field needs match a
configured shipping method for shipment tracking to work (see Recording Courier Shipping
Accounts).
button to open the default web browser
program and track the location of the entered shipment using the tracking web
site of the specified courier company. On entry windows that have menus, you may
also select Communication Track Shipment On-line from the main
menu. This button will only be enabled if the selected courier supports on-line
shipment tracking (see Shipping Methods), a
tracking code has been entered, and a web browser program is detected on your
computer. Only the first part of the Ship Via field needs match a
configured shipping method for shipment tracking to work (see Recording Courier Shipping
Accounts).
At Your Service presently supports on-line shipment tracking for commercial couriers listed in the following table. Tracking for each courier is available only for licensed users of the software version number listed in the last column, or any higher version number. Contact At Your Service Software, Inc. if you wish to have support added for an additional on-line courier tracking service.
Courier Tracking Web Sites
|
Courier |
Web Site |
Version |
|
ANC |
2.5 | |
|
Canada Post |
2.0 | |
|
Canpar |
2.0 | |
|
DHL Canada |
2.2 | |
|
DHL USA |
2.2 | |
|
FedEx |
2.0 | |
|
Purolator |
2.0 | |
|
TNT |
2.6 | |
|
United States Postal Service |
2.1 | |
|
UPS |
2.0 |
(See also Importing Courier Tracking Data.)
 Spell
Check
Spell
Check