Editing Repair Orders
Each form section and the entry fields available while adding, viewing, or editing repair order records (see Browsing Repair Orders) are discussed in the following table.
Repair Order - Main Area
The main repair order area is an overview of the main information that uniquely identifies this repair order as well as for entry of the repair order status.


Repair Order - Main Area Entry Fields
|
Field |
Description |
|
Repair Order No. |
Enter a unique 8-digit repair order number, or leave empty to automatically assign the next available sequential number for the business location of the logged in user (see Business Locations). |
|
Overview |
A summary of the Customer Name field, the Make field, and the Model field. This field is not directly editable, but automatically updates when the above-mentioned fields are edited. |
|
Status |
Enter or select the current repair status of the repair order. See Repair Statuses to customize the dropdown list. - list fields that are automatically updated - see repair status setup - quick selection by pressing the letter - selecting statuses from the browse window |
|
Invoice Date |
A summary of the invoice date if one has been entered. If the repair status has been set to a refused status (Repair Invoice Statuses) then the invoice date is the Date Estimate Refused field, otherwise the invoice date is the Date Repair Completed field. This field is not directly editable, but automatically updates when the above-mentioned fields are edited. |
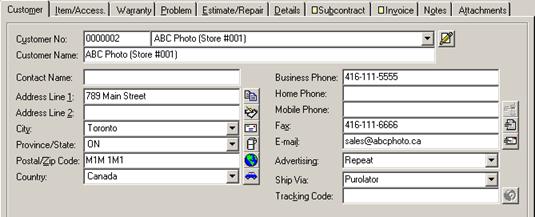
Repair Order - Customer Tab
The Customer tab is for entry of the shipping contact information for the customer who is actually having the work done. Communication tools next to certain contact information fields are automatically activated as data is entered in those fields. See Communication Tools for information on using the communication tools.
Repair Order - Customer Tab Entry Fields
|
Field |
Description |
|
Customer No. |
Enter a customer account number or quick code, or select the customer name. See Customers to customize the dropdown. For miscellaneous customers who do not have their own customer account, use account 0000000 (Miscellaneous). - information automatically filled in |
|
Customer Name |
Enter the customer name, up to 70 characters for licensed users of version 2.5 and higher, or up to 50 characters for all other versions. - look up previous miscellaneous customer |
|
Contact Name |
Enter a contact name for this customer, up to 32 characters. |
|
Address Line 1 |
Enter the first street address line for this customer, up to 32 characters. |
|
Address Line 2 |
Enter the second street address line for this customer, up to 32 characters. |
|
City |
Enter or select the city in which this customer is located, up to 32 characters. Which cities appear in the list as well as whether or not the cities appear in all-capitals is dependant on your geographic default settings (see the individual module options below the “Geographic Selection Lists” branch under General Module Options). The province or state and country corresponding to the city will be entered automatically. |
|
Province/State |
Enter or select the province or state in which this customer is located, up to 32 characters. Which provinces and states appear in the list as well as whether or not the provinces and states appear in all-capitals is dependant on your geographic default settings (see the individual module options below the “Geographic Selection Lists” branch under General Module Options). The country corresponding to the entered province or state will be entered automatically. |
|
Postal/Zip Code |
Enter the postal code or zip code for this customer, up to 10 characters. - forced to uppercase |
|
Country |
Enter or select the country in which this customer is located, up to 32 characters. The country assigned to the business location of the currently logged in user will be used as the default (see Business Locations). Whether or not the countries appear in all-capitals is dependant on your geographic default settings (see module option “Capitalize Geographic Selection Lists” under General Module Options). |
|
Business Phone |
Enter the business phone number for this customer, up to 23 characters. |
|
Home Phone |
Enter the home phone number for this customer, up to 23 characters. - look up previous miscellaneous customer |
|
Mobile Phone |
Enter the mobile phone number for this customer, up to 23 characters. |
|
Fax |
Enter the fax number for this customer, up to 23 characters. |
|
|
Enter the e-mail address for this customer, up to 50 characters for licensed users of version 2.1 and higher, or 32 characters for all other versions. |
|
Advertising |
Enter or select the advertising method used to find this customer. See Advertising Methods to customize the dropdown list. |
|
Ship Via |
Enter or select the shipping method used to ship items to or from the customer for this repair order. See Shipping Methods to customize the dropdown list. |
|
Tracking Code |
Enter the courier tracking code for the last shipment to or from the customer for this repair order. See Tracking Shipments On-Line for information on tracking the shipments on the Internet. |
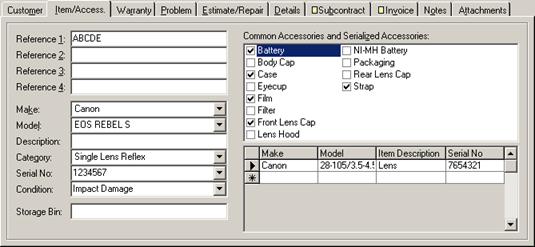
Repair Order - Item/Accessories Tab
The Item/Accessories tab is for entry of information about the actual item being serviced or repaired, as well as any accessories that are accompanying that item.
Repair Order - Item/Accessories Tab Entry Fields
|
Field |
Description |
|
Reference 1 |
Enter a first reference field for this repair order, usually a reference number provided by the customer, up to 30 characters. |
|
Reference 2 |
Enter a second reference field for this repair order, up to 30 characters. |
|
Reference 3 |
Enter a third reference field for this repair order, up to 30 characters. |
|
Reference 4 |
Enter a fourth reference field for this repair order, up to 30 characters. |
|
Make |
Enter or select the make of the item being serviced or repaired, up to 30 characters. This is a required field. See Makes and Models to customize the dropdown list. |
|
Model |
Enter or select the model of the item being serviced or repaired, up to 40 characters. See Makes and Models to customize the dropdown list. The dropdown list is filtered to only models belonging to the selected make. |
|
Description |
Enter a description of the item being serviced or repaired, up to 60 characters. This field is available only for licensed users of version 2.6 and higher. |
|
Category |
Enter or select a category for this item, or select one from the dropdown list. Entering the leading characters selects the first matching item from the list. |
|
Serial No. |
Enter the serial number associated with the item for repair. If the serial number is matched, the field will change color. A yellow background indicates a previous repair, while a red background indicated a Serial Number Notice. Information regarding the item, its previous repairs or important notices is automatically entered into the Notes area. |
|
Condition |
Enter or select the condition or state that the item to be serviced or repaired was in when it was received (e.g. impact damage, water damage, etc.) See Conditions to customize the dropdown list. The default condition for new repair orders may be set under module options (see module option “Default Condition for New Repair Orders” under Repair Order Module Options). |
|
Storage Bin |
Enter the label of the storage bin where the item to be serviced or repaired is stored while waiting for or during the repair process. |
|
Common Accessories |
Check off the applicable boxes for items that are associated with the repair. The list is customized during setup |
|
Serialized Accessories |
Items that are not included in the common accessories section or require additional tracking information (such as serial number) can be entered in the accessories fields below. Enter Make, Description and Serial Number for each item required. Serial Number matching is also provided for accessories and the relevant information is placed in the notes area. |
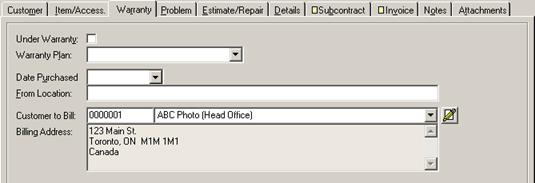
Repair Order - Warranty Tab
The Warranty tab is for entry of existing warranty information for the item being serviced or repaired, as well as customer billing information.
Repair Order - Warranty Tab Entry Fields
|
Field |
Description |
|
Under Warranty |
Check this box if the repair has been evaluated and is under a warranty plan (not applicable to a new repair order: status must be at least “Awaiting Repair or Repair in Process”). |
|
Warranty Plan |
Enter or select the name of the warranty plan that the item to repair is under. See Warranty Plans to customize the dropdown. |
|
Date Purchased |
Enter or select the date that the item to be serviced or repaired was originally purchased. |
|
From Location |
Enter the name of the location where the item to be serviced or repaired was originally purchased. |
|
Customer to Bill |
Enter the quick code or customer number (if known) of the customer to whom the warranty work may be billed. Alternatively select from the drop down list of approved billable customers for this make of repair. |
|
Billing Address |
The customer billing address is automatically populated from the customer selection. |
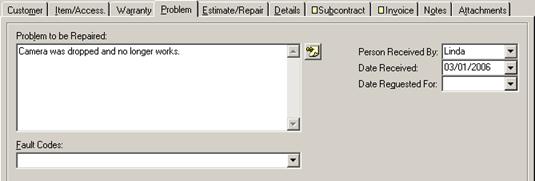
Repair Order - Problem Tab
The Problem tab is for entry of the problem that needs to be serviced or repaired including the manufacturer’s official classification of that problem, as well as the completion date for which the serviced or repaired item is being requested.
Repair Order - Problem Tab Entry Fields
|
Field |
Description |
|
Problem to be Repaired |
A text field is provided in which to describe the problem that is to be serviced or repaired. This field serves as a record of the original complaint and is recorded in the repair order and printed on customer and technician forms. |
|
Fault Codes |
|
|
Person Received By |
By default the current log-on is entered into this field as the person receiving the item and generating a new repair order. A drop down list allows for other users to be recorded. |
|
Date Received |
For new orders, the current date is automatically provided. For alternative dates, enter the date or click on the down arrow for a calendar. |
|
Date Requested For |
Enter a date or use the dropdown calendar to record a required date for the repair completion. |
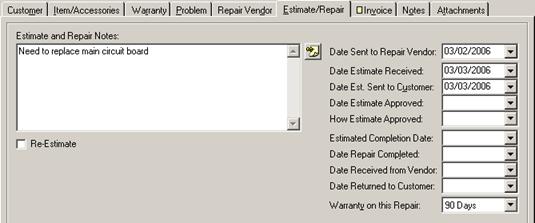
Repair Order - Estimate/Repair Tab
The Estimate/Repair Tab is for entry of estimate and repair notes, as well as a log of the repair process for tracking purposes.
- changes for retail editions as seen below

Repair Order - Estimate/Repair Tab Entry Fields
|
Field |
Description |
|
Estimate and Repair Notes |
A text field is provided for notes concerning the estimate, repair, and any other information relevant to the estimated work. |
|
Re-Estimate |
Check this box if the repair work is being re-estimated. |
|
Estimated By |
Enter the quick code or select from the drop down list the technician who has provided this estimate. |
|
Date Estimate Completed |
Enter a date or use the drop down calendar to enter the date this estimate was completed. |
|
Date Estimate Sent to Customer |
Enter a date or use the drop down calendar to enter the date this estimate was sent to the customer. |
|
Date Estimate Approved or |
Enter a date or use the drop down calendar to enter the date this estimate was approved by the customer. |
|
How Estimate Approved or |
Enter or select the method used to approve or refuse the estimate on this repair order, up to 20 characters. See Approval/Refusal Methods to customize the dropdown list. |
|
Estimated Completion Date |
Enter a date or use the drop down calendar to enter the date this repair is expected to be completed. |
|
Repaired By |
Enter or select the technician responsible for this repair. |
|
Repair Time |
If required, the repair time can be recorded by entering the number of hours, or using the up and down arrows. A stopwatch tool (see Stopwatch) is provided to assist in tracking time spent. |
|
Date Repair Completed |
Enter a date or use the drop down calendar to enter the date this repair was completed. |
|
Date Returned to Customer or Date Abandoned |
Enter a date or use the drop down calendar to enter the date this repair was returned to the customer. |
|
Warranty on this Repair |
Select from the drop down list the warranty plan applicable to this repair. The selection is set up under Warranty Terms, see page |
Repair Order - Details Tab
The Details tab is for entry of coded information including inventory items, service codes (including custom fields), and package codes that allow for a detailed breakdown and analysis of the repair process.
- total at bottom
- new screen snapshot with additional repair step columns

Repair Order - Details Tab Entry Fields
|
Column |
Description |
|
Code |
On a new line, enter a part number, service code, or package code. Package codes must be preceded by an asterisk (*) - forced to uppercase |
|
Type |
Enter the type of item or select from the drop down list (Note, Parts, Labour, Handling, Shipping, or Travel) - forced to uppercase |
|
Item Description |
Use the part name or service code description, or enter a new time manually. |
|
Quantity |
Any quantity of this item may be entered. Data provided by service code or package code defaults to a quantity of one. Data provided by inventory defaults to a quantity of one for each time “Pick To” is selected. - how the inventory is affected |
|
Unit Price |
The unit t price provided by inventory or service code can be modified. |
|
Total |
Totals are automatically provided for extended priced and overall repair total. - red if greater than the maximum allowed currency amount |
If parts are on order for the repair, then the Details tab also displays the status of each linked purchase order.
- not editable
- click link to purchase order or select from menu
- see purchase orders
- instructions on how to enter a cross-reference link on a purchase order
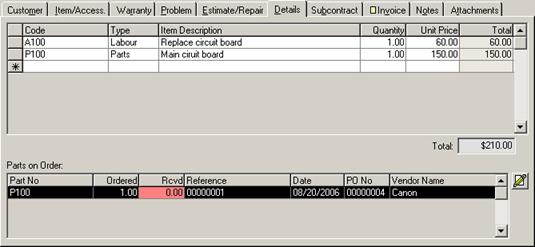
Repair Order - Details Tab Purchase Order Status
|
Column |
|
|
Part No. |
The part number of the item on order. |
|
Ordered |
The quantity of the item ordered on the linked purchase order. |
|
Received |
The quantity of the item received on the linked purchase order - green if the amount > 0, red if the amount = 0 |
|
Reference |
Reference numbers for the ordered items, including repair order numbers for which the items are reserved. |
|
Date |
The date the item was ordered. |
|
P.O. No. |
The purchase order number on which the item was ordered. |
|
Vendor Name |
The vendor from whom the item was ordered. |
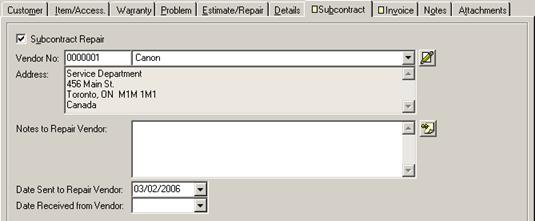
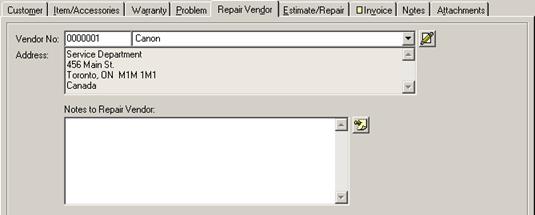
Repair Order - Subcontract Tab
The Subcontract tab is for entry of subcontract information when a repair is sent out to a repair subcontract vendor.
- see information on retail editions below
In repair edition only, version 2.6 and the checkbox is unchecked then if any data has been entered then prompt “Do you want to save the existing subcontract information in the private notes area and clear the fields, or just disable the subcontract information?” then the subcontract information and costs from the invoice tab are copied to the private notes section. Intended for use with multiple subcontractors.
Repair Order - Subcontract Tab Entry Fields
|
Field |
Description |
|
Subcontract Repair |
Check this box if this repair is to be done by a subcontractor. This allows for vendor information to be entered and provides for additional subcontractor information in the invoice tab. |
|
Vendor No. |
Enter the quick code or vendor number, or select a vendor from the drop down list available. |
|
Address |
|
|
Notes to Repair Vendor |
In addition to the original repair notes and the estimate notes, specific notes for the subcontract repair vendor can be included here. |
|
Date Sent to Repair Vendor |
Enter a date or use the drop down calendar to record the date this item was sent to the subcontractor for repair. |
|
Date Received from Vendor |
|
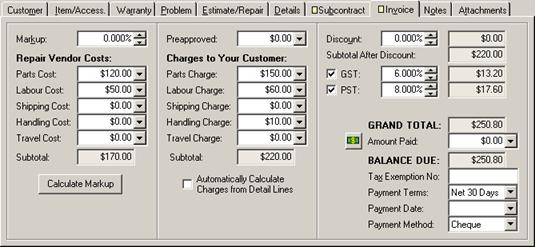
Repair Order - Invoice Tab
The Invoice tab is for entry and verification of the actual repair invoice charges, taxes, and payments.
- working with calculating markups
- working with detail lines or calculating overriding amounts
- using the payment button
Replace screen snapshot
Repair Order - Invoice Tab Entry Fields
|
Field |
Description |
|
Markup |
Enter or edit the percentage markup applied to this Repair Vendor. The markup will be used in transferring repair costs to the customer invoice (see Calculate Markup” below). Markup is applied to specific activities as defined during setup |
|
Parts Cost |
Enter or calculate the parts cost charged by the subcontracted repair vendor. |
|
Labour Cost |
Enter or calculate the labour cost charged by the subcontracted repair vendor. |
|
Shipping Cost |
Enter or calculate the shipping cost charged by the subcontracted repair vendor. |
|
Handling Cost |
Enter or calculate the handling cost charged by the subcontracted repair vendor. |
|
Travel Cost |
Enter or calculate the travel cost charged by the subcontracted repair vendor. |
|
Subtotal |
The subtotal of costs charged by the subcontracted repair vendor. This field is not directly editable, but is automatically updated by editing the cost fields. |
|
Preapproved |
Enter the repair charge amount that has been preapproved by a customer without the need for a later estimate approval. |
|
Parts Charge |
Enter charges for the customer invoice in any of three ways. Check on “Automatically Calculate Charges Form Detail Lines” to transfer totals from the details tab. Alternatively, if a repair vendor is used, click on “Calculate Markup” in the Repair Vendor section to transfer repair vendor charges. Finally, charges can be entered manually to override inventory or third party pricing, for example to offer a flat rate price to the customer. |
|
Labour Charge |
Enter charges for the customer invoice in any of three ways. Check on “Automatically Calculate Charges Form Detail Lines” to transfer totals from the details tab. Alternatively, if a repair vendor is used, click on “Calculate Markup” in the Repair Vendor section to transfer repair vendor charges. Finally, charges can be entered manually to override inventory or third party pricing, for example to offer a flat rate price to the customer. |
|
Shipping Charge |
Enter charges for the customer invoice in any of three ways. Check on “Automatically Calculate Charges Form Detail Lines” to transfer totals from the details tab. Alternatively, if a repair vendor is used, click on “Calculate Markup” in the Repair Vendor section to transfer repair vendor charges. Finally, charges can be entered manually to override inventory or third party pricing, for example to offer a flat rate price to the customer. |
|
Handling Charge |
Enter charges for the customer invoice in any of three ways. Check on “Automatically Calculate Charges Form Detail Lines” to transfer totals from the details tab. Alternatively, if a repair vendor is used, click on “Calculate Markup” in the Repair Vendor section to transfer repair vendor charges. Finally, charges can be entered manually to override inventory or third party pricing, for example to offer a flat rate price to the customer. |
|
Travel Charge |
Enter charges for the customer invoice in any of three ways. Check on “Automatically Calculate Charges Form Detail Lines” to transfer totals from the details tab. Alternatively, if a repair vendor is used, click on “Calculate Markup” in the Repair Vendor section to transfer repair vendor charges. Finally, charges can be entered manually to override inventory or third party pricing, for example to offer a flat rate price to the customer. |
|
Subtotal |
|
|
Automatically Calculate Charges from Detail Lines |
|
|
Discount |
Enter a discount percentage to be applied for this order. The discount will be applied to items designated during setup (see Discounts). |
|
Subtotal After Discount |
|
|
Taxes |
Check the box next to each tax that is applicable on this invoice, or uncheck the box next to those taxes which are exempt on this invoice. See Editing Default Tax Categories and Rules for information on configuring default tax categories, rates, and rules. See Working with Taxes for information on how tax categories, rates, and rules are applied and edited. |
|
Grand Total |
|
|
Amount Paid |
This field will already show any amounts that have been recorded as being paid. A new amount entered here will override the previous data. To track cumulative payments, close the Repair Order and use the “Pay” button in the Repair Order Browse Window (see “Step 8: Paying Repair Invoices,” page 3). |
|
Balance Due |
|
|
Tax Exemption No. |
Enter a tax exemption number, up to 20 characters (see also Tax Exemptions). |
|
Payment Terms |
Select the payment terms used to pay this repair invoice. See Payment Terms to customize the dropdown list. The default payment terms assigned to new repair orders for the miscellaneous customer account (i.e. customer account 0000000) may be set under module options (see module option “Default Payment Terms for Miscellaneous Customers” under Customer Module Options). |
|
Payment Date or |
If no payments have been made on this repair invoice (or if the balance of payments is zero) then enter or select the date on which this repair invoice was paid. If one or more payments have already been made on this repair invoice that total to a non-zero balance then this field will display the date of the last individual payment and will not be editable. |
|
Payment Method or |
If no payments have been made on this repair invoice (or if the balance of payments is zero) then select the payment method used to pay this repair invoice. See “Payment Methods” on page 103 to customize the dropdown list. The default payment method assigned to new repair orders for the miscellaneous customer account (i.e. customer account 0000000) may be set under module options (see module option “Default Payment Method for Miscellaneous Customers” under Customer Module Options). If one or more payments have already been made on this repair invoice that total to a non-zero balance then this field will display the payment method of the last individual payment and will not be editable. |
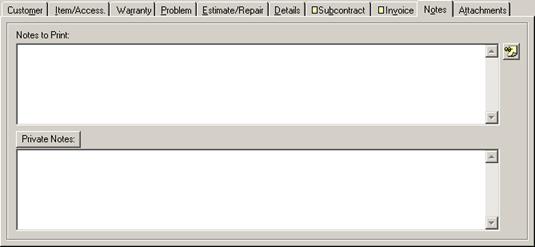
Repair Order - Notes Tab
The Notes tab is for entry of miscellaneous notes about this repair order.
- private notes button
Repair Order - Notes Tab Entry Fields
|
Field |
Description |
|
Notes to Print |
Enter any notes required to be printed on this Repair Orders. |
|
Private Notes |
Enter any notes required to be added to this repair order. Private notes are not printed out on forms and are available only for display. Click on this button to toggle the display of private notes on or off. |
Repair Order - Attachments Tab
The Attachments tab allows files, Internet hyperlinks, digital photographs, and electronic signatures to be attached to the repair order record. See Attachments for information on working with attachments.
Saving a Repair Order
xxx
Repair Orders in the Retail SQL and Retail Editions
The Retail SQL and Retail editions of At Your Service have tabs in a different order than the various repair editions because repairs are always sent to a subcontracted repair vendor. The Subcontract tab is instead called the Repair Vendor and comes immediately after the Problem tab.
Subcontract repair vendor tracking fields that are normally on the Subcontract tab are instead included on the Estimate/Repair tab.
 Working with Repair Orders